
Thanks to everyone who attended my webcast on mastering stairs in Autodesk Revit 2025. During the presentation I talked about and demonstrated the process of creating stairs such as single-story, multi-story and custom stairs. This webcast was geared towards users who wanted to learn more about working with the Revit stairs tool.
Topics that I covered:
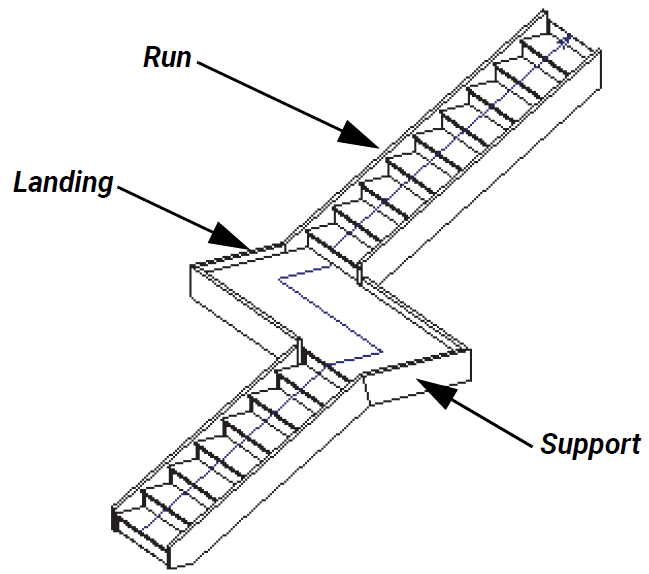
- An overview of the Revit stair components and properties.
- A review of the workflow for creating stairs.
- How to convert linework for runs, landings, and supports to create a custom stair.
- Demonstratation of how to create basic stairs, custom stairs, and how to modify and create custom stair types using an existing stair type.
- Software demonstration taken from practice exercises within ASCENT’s learning guide, Revit 2025: Fundamentals for Architecture:
o Create Component Stairs and Modify Component Stairs
Below are some questions that came up during the webcast:
Question: If I have a wall running underneath the stair, how can I extend the wall to attach to the profile of the stair?
Answer: To accomplish this, I would create a section view that faces the wall under the stairs. Then in the section view, I would edit the walls profile to extend and modify the top of the walls sketch line as needed.
Another option would be to add a reference plane along your stringer or along where you want the wall to come up to. Then you can use the Attach Wall At command to automatically attach the wall at the reference plane line.

Question: Any tips and tricks for how to use these in concrete with steel structures and connections. Possibly for future detailing in Advanced Steel?
Answer: Without knowing too much on what you are looking to accomplish, you could use Revit to put the connections in. You may need to make your own plates and bolts in Revit from the Steel tab and then there is a connection called embed plate Clip angle that allows to connect beam to concrete.
Question: Any tips for dragging out the treads grip because sometimes I drag it in and is says like 4+2 and then I drag it out and it doesn't go back to the original state, and I have to just delete the stair and start again.
Answer: I have seen this happen before but can't reproduce the issue without knowing any other circumstances with the model or elements tied to the stairs. The circle grip should allow you to stretch the riser back to its original count. For example, if I stretch my stairs out to show 18+2, then I click finish. If I go back into edit mode, select the circle grip and stretch the risers back to 18, it should work.

Question: Will there be a webinar on railings?
Answer: I don't have my next webinar currently scheduled, but since there were multiple people interested in this topic, I plan to present on this topic within the next few months. Please check back on our Upcoming Webcasts page for more details as we will post the information here once the date and registration link is ready.
Question: Where do we find your blog?
Answer: You can see all of my blogs on our website by clicking this link: Cherisse Biddulph (ascented.com)
Question: I'm interested in learning how to change the shape of a stair. For example, in the beginning of the session we were shown a stair that had a rounded end on the first tread. How do I do that? I'm also wondering how to create stairs that will go along a curved wall.
Answer: I will write a blog on showing how to edit stairs as well as how to create curved stairs that follow a curved wall, so stay tuned for that! But to modify the stair design, you would need to be in the edit stair mode, then you would select on the stair and click Convert from the ribbon. To edit each component of the stair you would need to click Edit Sketch and then you will be able to select on all the lines individually. For a curved stair, I would use the sketch stairs method similar to the stairs I created in front of the building in the webcast.
Thanks again for all your questions, and don't forget to check out my Revit 2025: Fundamentals for Architecture and Revit 2024: Fundamentals for Residential Design learning guides available for purchase on the ASCENT website.
About the Author
Follow on Linkedin More Content by Cherisse Biddulph


